Prices subject to change without notice
*Price includes U. S. customs duty, processing fees, currency-conversion fees, and shipping & insurance from the manufacturer to our office in the USA
*UPS Ground insured within the contiguous 48 states. We combine shipping with multiple items, offer expedited shipping, and ship to other locales inside or outside the USA. Please see full shipping options, terms & conditions.
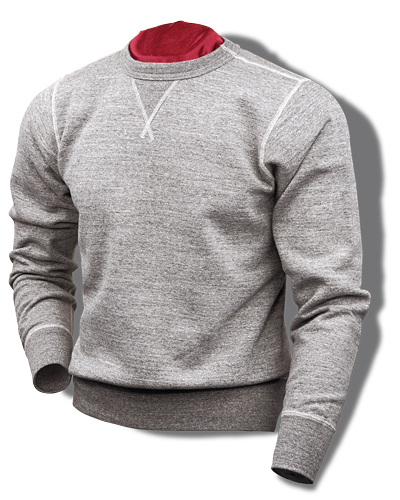
Buzz Rickson Sweatshirt, Loop-Wheeled, Set-In-Sleeve, Heather Grey
Buzz Rickson Sweatshirt, Loop-Wheeled, Set-In-Sleeve, Heather Grey

Prices subject to change without notice
*Price includes
U. S. customs duty,
processing fees, currency-
conversion fees and
shipping & insurance from
the manufacturer to the USA.
*UPS Ground insured within the contiguous 48 states. We combine shipping with multiple items, offer expedited shipping, and ship to other locales inside or outside the USA. Please see full shipping options, terms & conditions.
- Product Information
- Sizing Tips
- Product Measurements
- Measuring Garments
- Body Measuring
- Product Information
Now, you may ask, what is a Buzz Rickson four-needle, set-in-sleeve, loop-wheeled sweatshirt? Four-needle sewing machines overlay the edges of all seams, creating a flatter, smoother seam construction with far less seam allowance, thus decreasing bulk. Loop-wheeling looms are special machines that are able to weave a perfect tube, but they can only weave one set diameter per loom; this means the factory needs a different loom for each size – very expensive – which is why you hardly ever see true tube construction in modern-day garments. Even the most expensive designer sweatshirts will usually have a side seam – sometimes two seams! Tube construction ensures true shape is maintained, not only during its construction, but during its life of wear. This is the proper way to make a sweatshirt; in the good old days, the proper way was the only way. It’s cheap and easy to make shirts from a flat piece of cloth, and most customers would never notice the difference, though they may wonder why their not-so-cheap sweatshirt seemed to lose its shape after only a few washes – but now you know.
Traditional vintage-style sweatshirts of this caliber are not available even from the fashion high street. With shrewd foresight of the oncoming vintage clothing market, much of the old, U.S.-made 1920’s machinery and looms were bought up by the Japanese in the 1970’s when they were otherwise deemed obsolete. These old looms, although much slower than modern machinery, are able to produce much higher-quality fabric – fabric that perfectly matches the quality of those garments made from the good old days. For those who can appreciate such quality, these sweatshirts are sure to please.
Buzz Rickson’s premium, vintage-style, all-cotton athletic sweatshirts are made from medium-weight, 100% cotton fabricated on 1920’s-vintage loop-wheeling machines, styled with all the correct features found on the old sweatshirts, and cut to hug the body in a flattering form without bulk, just as the vintage originals did. Limited quantities available. Take note of these authentic vintage styling features:
• Custom manufacturing of the medium-weight, all-cotton fleece fabricated on a vintage loop-wheeling loom
• Vintage wash
• Four-needle, TUBE-Body construction with no side seams, and with lock stitch throughout
• Vee-placket neck detail
• Set-in sleeves
• Four-inch cuff and waistband
• Exact copy of the original-style rayon-on-cotton labels
• True vintage fit for flattering appearance, not a sloppy, relaxed fit with droopy shoulder seams
Sizes: Small, Medium, Large, XL & XXL. Please see our SIZING TIPS for advice on how to get the correct fit.
Imported from Japan
- Sizing Tips
SIZING TIPS
About this Style: The sizing on the sweatshirts is trim, though it follows the vintage fits perfectly. These are meant to be worn close to the body and they feature a narrow shoulder span, higher armholes, and narrow, tapered sleeves without the excess bulk and blousing at the cuff area as found on typical mainstream sweatshirts that can be readily purchased easily today.
Most individuals today are unfamiliar with how clothing was once worn and meant to fit, especially sweatshirts. You will look better in a sweatshirt of this type whether you are lean or more on the hefty side of body shapes, though those who are especially heavy in the mid-section should note that these shirts will not camouflage this body area via excess fabric. A permanent size gain of 1” or even a bit more can be achieved by forcibly stretching outward on the tube body, though going up a size may be the best alternative for those who find any given size too snug. Most of our customers wear these shirts as per the original trim look, but some elect to order one size up, which will not just provide more room, but will yield more drape to the shirt, though not on the same level as the drape experienced in the typical mainstream contemporary sweatshirt.
Tip 1: Follow the instructions entitled “How to Use Product Measures to Obtain a Good Fit” listed under the PRODUCT MEASUREMENTS tab for this product. After finding no substantive conflicts with your body measures obtained from the tab entitled BODY MEASURING, order this garment with no less than 2” of room in excess of your chest circumference measure if you prefer a trim fit. For example: If your chest measures 40” and you want a snug fit, order size Medium 38-40, which will have a chest circumference measure in the shirt of 42”. If you prefer a roomier or longer fit, then order the next available size after reviewing all relative measures that pertain to that size.
Tip 2: Please note that your chest circumference measure is not necessarily the labeled size you wear in another garment you may own from a different maker or even the same maker, so please take the time to obtain your true chest circumference measure so as to compare to our chart of measures; this will enable us to perform a better job getting you the right size and minimize your chances in having to deal with the hassle and cost of exchanges.
Please ask us for fitting advice if in doubt.
Tip 3: Individuals who prefer looser fits and/or those with a waist measure that is nearly equal to or greater than their chest circumference measure may jump up one size in this shirt for comfort and desired fit (when we refer to waist measure we do not mean your trouser size; we mean the actual circumference measure of your waistline at its widest point). If you are unsure of the size to order we will assist you; please contact us with the following information: Height, waist circumference measure, chest circumference measure, body weight, and type of clothing to be worn beneath the shirt most of the time, as well as the type of fit you prefer: Trim, roomy or oversized.
- Product Measurements
PRODUCT MEASUREMENTS
The following table provides actual product measures. These measures are provided as an aid because, in conjunction with the information found under the SIZING TIPS tab for each product, they can sometimes be very useful when comparing the measurements from this garment to the measures of your body; however, acting as an armchair tailor should be done with caution, as well as with knowledge of other important areas of fit that are not displayed here. Armchair tailors frequently fail to take into account other significant elements that impact fit; following the information found under the SIZING TIPS tab for each garment on this web site is strongly suggested, which can be very useful in supplanting or supplementing the listed measures below.
Our measures were derived from averaging many garments of the same size from each specific size in the range of any given product, thus the measures provided are representative for each size but they may not be exactly what you will receive. Some fluctuation in size is normal and to be expected, especially in these garments that have been manufactured on vintage machinery using natural fibers; the vintage machinery and techniques that create sought-after looks and fabrics are also less precise than machines contemporary to the current era.
Size Sm 36-38 Med 38-40 Lg 40-42 XL 42-44 XXL 44-46 Chest width 20″ 21″ 22″ 23″ 24″ Shoulder width 15″ 16″ 17″ 18″ 19.5″ Arm length 25″ 26″ 26″ 27″ 27″ Back length 24″ 25″ 26″ 27″ 28″ How to Use the Product Measures to Obtain a Good Fit:
1) Using the measurements listed for this product and information found under the tab entitled MEASURING GARMENTS to understand our measuring technique, please double the chest measure to obtain the total external chest circumference of this garment. For example: If the chest measure listed for size Medium 38-40 is 21”, doubling this measure yields a 42” external chest circumference.
2) Measure your chest circumference as per the tab on this web site specifically addressing BODY MEASURING, then compare your chest measure to the chest measure of this product.
3) Many garments are cut in such a way that the wearer requires no less than 2” of room in the shirt for a sleek fit that is also comfortable, while other shirts styles require the wearer to have more than 5” of room. If your chest circumference is 40”, a product with a 21” chest width has a 42” external chest circumference and would provide 2” of external room in this scenario (chest measures 40”, external chest measure of shirt is 42”, thus 2” of external room would be realized).
4) Again, using the measurements listed for this product and information under the MEASURING GARMENTS tab to understand our measuring technique, add half of the shoulder width to the arm length. For example: If the shoulder width is 18” and the arm length is 24”, adding 9” (half the shoulder width) to 24” (the arm length) will yield an overall sleeve length of 33” in this product.
5) Measure your overall sleeve length following the instructions on this web site under the tab specifically addressing BODY MEASURING, then compare your overall sleeve length to this product.
6) If desired, repeat the measuring comparisons for back length.
7) Compare your body measures to the listed garment measures and follow the advice found under the SIZING TIPS tab to obtain a good fit.
IMPORTANT: Because you need room in a garment for comfort, garments with a 44” chest circumference are NOT a size 44, nor are they intended for anyone with a 44” chest circumference. Tee shirts and thermal shirts tend to have the most body-hugging fits of our product offerings because these were originally intended to be undergarments, thus these can be ordered to stretch to fit if that is how you wish to wear such garments. Other shirts, sweatshirts, sweaters, jackets, etc. will all have some amount of room incorporated in their designs, thus these will all measure larger than your actual chest measure by varying degrees.
Sometimes-Problematic Way to Determine a Good Fit:
Due to differences in how even near-identical garments are cut by different manufacturers, it is not necessarily a good idea to compare the listed measures of this product to the measures of an existing, similar product in your wardrobe to determine the correct size to order in this product. Though such comparisons can indeed work some of the time, and maybe even most of the time, vast experience with and knowledge of the products we market has proven such practices will sometimes fail. This inaccurate measuring methodology doesn’t factor in other key variables of fit relative to you and the garment that includes: Armhole opening, shoulder slope, high-point shoulder, high chest, width of sleeves at all points including the all-important elbow, waist measure, and the thickness, plumpness, and rigidity of the material the garment is made from, naming just some variables influencing fit that do not appear on any list of measurements for a garment or that a customer is likely to account for.
It is best to compare your actual body measures to the listed measures of this product AND follow our advice listed under the SIZING TIPS tab specific to this product to obtain a good fit in this style.
A Good Fit:
This is highly subjective – what one person may think is too big, another may think fits perfectly. Some garments are cut quite generously and others are cut quite trimly. If comparing measurements of one of our products to another you may own, some individuals will surely find that none or maybe only one area of measure is commonly shared or remotely close to being the same. Ultimately, chest measure is the most important area to properly fit, then all other areas of measure will have to fall into place. And some individuals who are extremely tall may find that body and/or sleeve length are more important to accommodate than even chest measure.
It is best to compare your actual body measures to the listed measures of this product AND follow our advice listed under the SIZING TIPS tab specific to this product to obtain a good fit in this style.
We strive to create a crisp fit between our products and the customer, and not a loose, sloppy look. If you prefer your clothing to fit more loosely, then we will do our best to work with you to that end, though, by the very nature of our product designs and fits it may not be possible to duplicate the slack looks found in many mainstream clothing brands even if you go up one or two sizes in our products.
- Measuring Garments
MEASURING GARMENTS
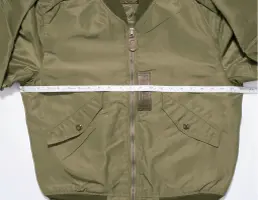
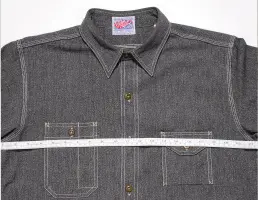
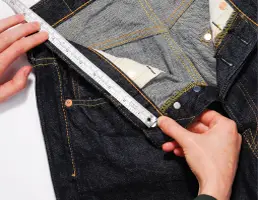
This section will explain and illustrate the measuring techniques we employed to derive the garment measurements found under the PRODUCT MEASUREMENTS tabs related to each of our products; additionally, this section provides the educational tools to enable the accurate measuring of any garments you may have access to for comparison. Garment measurements are invaluable when used in conjunction with the instructions found under the tab BODY MEASURING, as well requisite for following our advice found under the tab SIZING TIPS.
Please click on the appropriate link below that relates to the product category for which you wish to ascertain garment-measuring instructions:
- Body Measuring
BODY MEASURING
Measuring for Jackets and Shirts
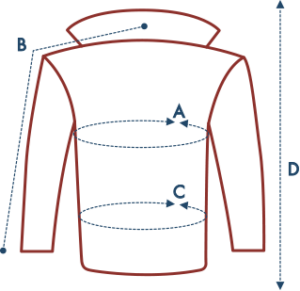 Please take these measures wearing just a thin shirt or undershirt or with no shirt at all. Simply note the following measures on a sheet of paper so you can comapre your findings to our listed measurements found under the PRODUCT MEASUREMENTS tab or so you can request assistance from us. Please always refer to the information found under the SIZING TIPS tab that is specific to each product.
A) CHEST—Measure high under armpits, spanning the widest part of your chest, then wrap tape around for one 360-degree complete circumference measurement.
B) SLEEVE – Measure from the nape of the neck to the shoulder edge, then down the arm to the bottom of the wrist bone.
C) WAIST – Measure the widest part of your waistline for a complete 360-degree circumference measurement.
D) HEIGHT – Your total overall height
E) BODY WEIGHT – Your total body weight
A Good Jacket Fit
There is no industry standard for grading size: Any jacket we offer in, say, size 42, may very well not be the same measure as another jacket of the exact same size made by a different company, or even if made by the same company. Ultimately, chest measure is the most important area to properly fit, then all other areas of measure will have to fall into place. And some individuals who are extremely tall may find that body and/or sleeve length are more important to accommodate than even chest measure.
Do NOT attempt to guess your size in our jackets, and please understand that no jacket can be two jackets in one (you may have to make a compromise in fit somewhere). The best look is achieved wearing a shirt and undershirt, or a medium-weight sweater with undershirt; the goal being a trim, sleek look. If the application of our jackets is with multiple layers of clothing, then the original look will be compromised. When purchased oversized, please keep in mind that the jacket will fit NOT trimly but LOOSELY when fewer clothes are worn.
It is best to compare your actual body measures to the measurements of one of our products found under the tab
PRODUCT MEASUREMENTS, then follow our sizing pointers found under the tab SIZING TIPS, which are specific to each product. And never be reluctant to ask us for sizing advice; we’re here to help you get the best fit possible!As a rule here, if the jacket squares up nicely on the shoulders when worn with the sort of clothing you will wear most of the time, falls about 1 1/2″ below the top of your trousers (if a waist-length jacket), allows you to reach into trouser pockets and recover keys, wallet and change without discomfort or pain, as well as allow normal strides while walking, then this is very likely a good fit and how the jacket would have been worn when originally issued.
Using the good-fit test where one draws their arms across their chest as a barometer for snugness will almost certainly produce some binding in an A-2 jacket of the correct size, and thus push you further up the sizing scale into a very large A-2 jacket. A true 1940s A-2 jacket has no bi-swing action back (as found on the USN M-422A or G-1jackets, USAAF B-6, Tanker jacket, etc.) and is not cut for such a great range of movement as experienced when doing the arm-crossing act. If you can get that sort of movement range without binding in one of our A-2s, then it will surely be rather loose and sloppy when you aren’t drawing your arms across your chest in front of you.
What makes more sense, having a jacket that looks great and feels fine during 90% of your activities, or only when you cross your arms in front of you? Do you walk around with your arms crossed in front of you? The choice is yours and we will gladly oblige all tastes, but do try to get the look originally intended.
Measuring for Caps
 Caps – Measure the circumference around the widest portion of the head just above the ears and brow where the cap will sit. The number you derive from this exercise must be converted to a numerical cap size. Please use the chart below to convert your head circumference measure to a numerical cap size, which will then enable you to following the SIZING TIPS for our caps to place and order.
If you need any assistance, please contact us.
Head Circumference Inches Head Circumference Centimeters Hat Size 22″ 56 cm 7 22 3/8″ 57 cm 7 1/8 22 3/4″ 58 cm 7 1/4 23 1/8″ 59 cm 7 3/8 23 1/2″ 60 cm 7 1/2 Measuring for Gloves
 Gloves – Measure the circumference around the widest portion of the knuckles (excluding thumb) while holding your hand flat. The number you derive, say, 9”, is your numerical glove size. With select glove styles on this web site we ask you to provide us with this number derived from measuring your hand knuckle circumference, then we’ll make the correct size selection for you in conjunction with your input. Where we request this information, please provide the true number even if your hand measure falls between numbers, say, 9 ¼”; you’ll be able to add a memo to your order in the checkout process informing us as to the details of your hand measure and we’ll intereact with you to determine if rounding this number up is the best choice. Always follow the SIZING TIPS for each product to determine what you need to know for ordering.
If you need any assistance, please contact us.
Measuring for Jeans and Trousers
A) WAIST – Using a tape measure, measure the full circumference in a 360-degree circle around your waistline where you plan to you’re your jeans or trousers (if you have a large mid-section but plan to wear the jeans or trousers below your belly, then measure the area where you will wear the jeans or trousers). It is sometimes better to measure the widest portion of your waistline regardless of where you actually where your jeans or trousers, which is the case when measuring yourself for a jacket or shirt. Always follow the SIZING TIPS for each product to determine where it is best that you should measure.
B) INSEAM – While wearing the footwear you normally would have on with the jeans or trousers you plan to order, measure your inseam length with a measuring tape beginning at the highest point of either inside leg up in the crotch area and measure down the inside leg to where you want the trousers or jeans to end; the measure you derive is your inseam length. This measuring exercise is best performed by another individual while you are standing upright with you legs straight. You may compare your inseam length to the PRODUCT MEASUREMNTS specific for each product found under the tab of this same name or on the PRODUCT INFORMATION tab.
You may also want to compare other areas of fit for each product, such as front rise or thigh width, which are found under the PRODUCT MEASUREMNTS tab specific to each product.
If you need any assistance, please contact us.
* Prices subject to change without notice.
* Ground insured within the contiguous 48 states. We combine shipping with multiple items, offer expedited shipping, and ship to other locales inside or outside the USA. Please see full shipping options, terms & conditions. Please see full shipping options, terms & conditions.

