
Prices subject to change without notice
*Price includes U. S. customs duty, processing fees, currency-conversion fees, and shipping & insurance from the manufacturer to our office in the USA
*UPS Ground insured within the contiguous 48 states. We combine shipping with multiple items, offer expedited shipping, and ship to other locales inside or outside the USA. Please see full shipping options, terms & conditions.
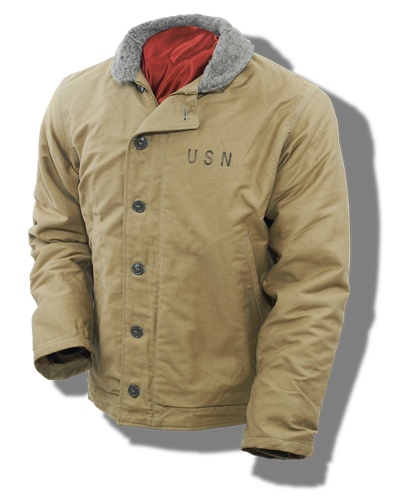
Buzz Rickson N-1 Deck Jacket, white-space: nowrap">U. S. Navy, Khaki
Buzz Rickson N-1 Deck Jacket, white-space: nowrap">U. S. Navy, Khaki
Prices subject to change without notice
*Price includes
U. S. customs duty,
processing fees, currency-
conversion fees and
shipping & insurance from
the manufacturer to the USA.
*UPS Ground insured within the contiguous 48 states. We combine shipping with multiple items, offer expedited shipping, and ship to other locales inside or outside the USA. Please see full shipping options, terms & conditions.
- Product Information
- Sizing Tips
- Product Measurements
- Measuring Garments
- Body Measuring
- Product Information
The white-space: nowrap”>U. S. Navy developed and used many different styles of cold-weather gear and clothing during the 1940s. A sailor’s duties are very often performed in the most challenging and harsh weather conditions while at sea, thus clothing needed to be durable, warm and functional. Winter jackets, commonly referred to as “Deck Jackets,” became the most cherished clothing articles of sailors during WWII and among collectors today. Most of the deck jackets used in WWII evolved from a blue zip-front design that was very similar in appearance to the white-space: nowrap”>U. S. Army’s Winter Combat Jacket (Tanker Jacket). By late 1943, the second version of this Deck Jacket design was being phased out of production and an entirely new design was being brought into use: the N-1.
This all-new jacket took into account the lessons learned from two hard years of warfare at sea. Though still manufactured with the same dark blue corded-cotton outer shell as on earlier examples, alpaca fur was now used as the lining material and the torso length grew longer for greater protection from the elements. The knit collar was replaced with an alpaca-fur collar, and also gone were the knit waist bands, exposed knit cuffs and patch pockets of the old jackets, all of which tended to snag on various objects or parts of a ship and cause tearing. A new cuff design incorporated the knit cuff hidden up inside the sleeve, thus keeping the knit from snagging while still keeping out the cold wind, and the frontal jacket closure was now facilitated by a zipper as well as buttons. A drawstring at the jacket’s bottom edges kept the wind out more effectively than the old knit band, all the while eliminating the snagging problem associated with knit bands, and gusseted armpit areas with eyelet vents provided greater freedom of movement and rapid drying of built-up perspiration. Produced in very small numbers and but for a brief period, this new design was quickly superceded by a second version manufactured in a light olive drab color (now commonly called khaki) of the same heavy, corded fabric. The fabric color was changed from blue to this shade of olive drab to better enable camouflaging of USN personnel both at sea and on landing operations. This newer-colored version of the winter deck jacket was available in limited numbers by the spring of 1944 and photo documentation clearly reveals some sailors, including Rear Admiral white-space: nowrap”>A. D. Struble onboard the command ship USS AUGUSTA, outfitted with this jacket style during the D-Day landings in Normandy, France on 6 June 1944.
The deck jacket was modified again after WWII, with the most notable difference being the change in color from light olive drab to a dark olive green. Further modifications were made to the design before being completely phased out in the 1960s, thus making the N-1-style deck jacket the longest serving in the white-space: nowrap”>U. S. Navy, and possible the best remembered. The N-1-style Deck Jacket is an all-American classic that looks as great today as it did in 1944, and it functions with many different clothing applications – surely this will fast become a favorite item in your wardrobe. Scorn the cookie-cutter look of “mall” jackets and grab a piece of 20th century American history that combines style with durability and utility.
This Buzz Rickson’s USN khaki N-1-style Deck Jacket copy superbly captures all of the nuances and features found on a vintage original example from 1944. Take note of these authentic features:
• Exact copy of original USN contract label design printed on cotton fabric
• Exact duplication of the original black stencil property mark “USN” applied to left chest
• Custom manufacturing of the correct, heavy, corded-cotton outer shell to precisely match USN specs. and dyed a light shade of khaki-like Olive Drab
• Cotton-thread construction
• Custom manufacturing of the correct double-faced, grey-hued alpaca fur-and-wool lining to precisely match 1940s USN specs. We cannot say too much about the use of the original, double-faced alpaca, which is what provides the warmth associated with the vintage N-1 Jackets and requires vintage machinery found in Japan; at best, single-faced alpaca is present on cheaper look-alike costume-grade N-1 Jackets and Buzz Rickson’s does not make costumes.
• Two external slash pockets
• Vintage-style 1943 brass CONMATIC zipper
• Button-front wind flap protector located in front of zipper closure
• Custom manufacturing of the correct, two-ply, worsted-wool knit cuffs in Olive Drab, hidden up inside the sleeves to protect from wear
• Gusseted-armpit construction with eyelet vents
• Drawstring cords at jacket bottom to seal out the wind
Sizes: XS – XXL. Please see our SIZING TIPS for advice on how to get the correct fit.
Buzz Rickson’s goods are imported from Japan
- Sizing Tips
SIZING TIPS
About this Style: It is important to keep in mind that this jacket style does have an alpaca lining, thus the external chest measures listed here are just that – EXTERNAL measures – and don’t account for the slightly lesser amount of room on the inside of the jacket. Likewise, if you plan to wear heavy layers under this jacket style, that application will further subtract from the room inside the jacket. However, the N-1 is a very easy-wearing style that creates very few sizing issues for the overwhelming majority of individuals. About 70% of our customers prefer an N-1 to fit 6” larger than their chest measure, while the remaining 30% prefer to have a fit 8” larger than their chest measure.
When comparing the sizes in this jacket style to other Buzz Rickson jacket styles sized numerically, the size range would approximately equate as follows:
Small/36 Medium/38 Large/40 XL/42 XXL/44 XXXL/46
Tip 1: Follow the instructions entitled “How to Use Product Measures to Obtain a Good Fit” listed under the PRODUCT MEASUREMENTS tab for this product. After finding no substantive conflicts with your body measures obtained from the tab entitled BODY MEASURING, order this garment with no less than 6”of room in excess of your chest measure if you prefer a trim fit throughout, thus if you have a 40” chest circumference measure, order size LARGE. It is best advised for the vast majority of customers to order a size that maintains 6” of external room between the wearer and the jacket: Chest measures 40”, order size LARGE. That size selection will maintain the 6” of room between the jacket and the wearer. If a roomier or longer fit is desired, then order the next available size after reviewing all relative measures that pertain to that size. Those whose chest measure falls on an odd number, such as 41” or 43”, will have to determine if they want less room or more room when selecting a jacket size.
Tip 2: Please note that your chest circumference measure is not necessarily the labeled size you wear in another jacket you may own from a different maker or even the same maker, so please take the time to obtain your true chest circumference measure so as to compare to our chart of jacket measures; this will enable us to perform a better job getting you the right size and minimize your chances in having to deal with the hassle and cost of exchanges.
Please ask us for fitting advice if in doubt.
Tip 3: Individuals who prefer looser fits and/or those with a waist measure that is nearly equal to or greater than their chest circumference measure may jump up one size in this jacket for comfort and desired fit (when we refer to waist measure we do not mean your trouser size; we mean the actual circumference measure of your waistline at its widest point). If you are unsure of the size to order we will assist you; please contact us with the following information: Height, waist circumference measure, chest circumference measure, body weight, and type of clothing to be worn beneath the jacket most of the time, as well as the type of fit you prefer: Trim, roomy or oversized.
- Product Measurements
PRODUCT MEASUREMENTS
The following table provides actual product measures. These measures are provided as an aid because, in conjunction with the information found under the SIZING TIPS tab for each product, they can sometimes be very useful when comparing the measurements from this garment to the measures of your body; however, acting as an armchair tailor should be done with caution, as well as with knowledge of other important areas of fit that are not displayed here. Armchair tailors frequently fail to take into account other significant elements that impact fit; following the information found under the SIZING TIPS tab for each garment on this web site is strongly suggested, which can be very useful in supplanting or supplementing the listed measures below.
Our measures were derived from averaging measurements taken from many garments of the same size from each specific size in the range of any given product, thus the measures provided are representative for each size but they may not be exactly what you will receive. Some fluctuation in size is normal and to be expected, especially in these garments that have been manufactured on the bench by hand. Size fluctuations are rarely encountered in the width measures and more typically encountered in length measures, and particularly with respect to leather jackets and jackets with knit cuffs and waistbands. Fluctuations in width measures are very rare, and when they are encountered they are typically insignificant: 1/8” – ¼”. Normal fluctuations in sleeve and/or body length + /- a ½” are more common but still rare, and such fluctuations in that increment range are within spec. for jackets of the same size and style.
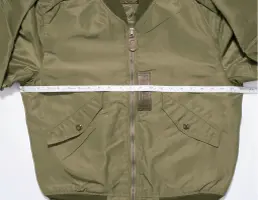
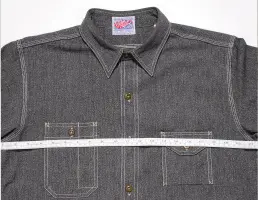
Size S M L XL XXL XXXL Chest width 21″ 22″ 23″ 24″ 25″ 26″ Shoulder width 17″ 18″ 19″ 20″ 20″ 21″ Arm length 23.5″ 24.5″ 26″ 26″ 26″ 27″ Back length 25.5″ 26.5″ 27.5″ 27.5″ 28.5″ 28.5″ How to Use the Product Measures to Obtain a Good Fit:
1) Using the measurements listed for this product and information found under the tab entitled MEASURING GARMENTS to understand our measuring technique, please double the chest measure to obtain the total external chest circumference of this garment. For example: If the chest measure listed for size LARGE is 23”, doubling this measure yields a 46” external chest circumference.
2) Measure your chest circumference as per the tab on this web site specifically addressing BODY MEASURING, then compare your chest measure to the chest measure of this product.
3) Many jackets are cut in such a way that the wearer requires no less than 4” of room in the jacket for a sleek fit that is also comfortable, while other jacket styles require the wearer to have more than 8” of room. If your chest circumference is 40”, a product with a 23” chest width has a 46” external chest circumference and would provide 6” of external room in this scenario (chest measures 40”, external chest measure of jacket is 46”, thus 6” of external room would be realized).
4) Again, using the measurements listed for this product and information under the MEASURING GARMENTS tab to understand our measuring technique, add half of the shoulder width to the arm length. For example: If the shoulder width is 19” and the arm length is 26”, adding 9.5” (half the shoulder width) to 26” (the arm length) will yield an overall sleeve length of 35.5” in this product.
5) Measure your overall sleeve length following the instructions on this web site under the tab specifically addressing BODY MEASURING, then compare your overall sleeve length to this product.
6) If desired, repeat the measuring comparisons for back length.
7) Compare your body measures to the listed garment measures and follow the advice found under the SIZING TIPS tab to obtain a good fit.
IMPORTANT: Because you need room in a garment for comfort, garments with a 44” chest circumference are NOT a size 44, nor are they intended for anyone with a 44” chest circumference. Tee shirts and thermal shirts tend to have the most body-hugging fits of our product offerings because these were originally intended to be undergarments, thus these can be ordered to stretch to fit if that is how you wish to wear such garments. Other shirts, sweatshirts, sweaters, jackets, etc. will all have some amount of room incorporated in their designs, thus these will all measure larger than your actual chest measure by varying degrees.
Sometimes-Problematic Way to Determine a Good Fit:
Due to differences in how even near-identical garments are cut by different manufacturers, it is not necessarily a good idea to compare the listed measures of this product to the measures of an existing, similar product in your wardrobe to determine the correct size to order in this product. Though such comparisons can indeed work some of the time, and maybe even most of the time, vast experience with and knowledge of the products we market has proven such practices will sometimes fail. This inaccurate measuring methodology doesn’t factor in other key variables of fit relative to you and the garment that includes: Armhole opening, shoulder slope, high-point shoulder, high chest, width of sleeves at all points including the all-important elbow, waist measure, and the thickness, plumpness, and rigidity of the material the garment is made from, naming just some variables influencing fit that do not appear on any list of measurements for a garment or that a customer is likely to account for.
It is best to compare your actual body measures to the listed measures of this product AND follow our advice listed under the SIZING TIPS tab specific to this product to obtain a good fit in this style.
A Good Fit:
This is highly subjective – what one person may think is too big, another may think fits perfectly. Some garments are cut quite generously and others are cut quite trimly. If comparing measurements of one of our products to another you may own, some individuals will surely find that none or maybe only one area of measure is commonly shared or remotely close to being the same. Ultimately, chest measure is the most important area to properly fit, then all other areas of measure will have to fall into place. And some individuals who are extremely tall may find that body and/or sleeve length are more important to accommodate than even chest measure.
It is best to compare your actual body measures to the listed measures of this product AND follow our advice listed under the SIZING TIPS tab specific to this product to obtain a good fit in this style.
We strive to create a crisp fit between our products and the customer, and not a loose, sloppy look. If you prefer your clothing to fit more loosely, then we will do our best to work with you to that end, though, by the very nature of our product designs and fits it may not be possible to duplicate the slack looks found in many mainstream clothing brands even if you go up one or two sizes in our products.
- Measuring Garments
MEASURING GARMENTS
This section will explain and illustrate the measuring techniques we employed to derive the garment measurements found under the PRODUCT MEASUREMENTS tabs related to each of our products; additionally, this section provides the educational tools to enable the accurate measuring of any garments you may have access to for comparison. Garment measurements are invaluable when used in conjunction with the instructions found under the tab BODY MEASURING, as well requisite for following our advice found under the tab SIZING TIPS.
Please click on the appropriate link below that relates to the product category for which you wish to ascertain garment-measuring instructions:
- Body Measuring
BODY MEASURING
Measuring for Jackets and Shirts
 Please take these measures wearing just a thin shirt or undershirt or with no shirt at all. Simply note the following measures on a sheet of paper so you can comapre your findings to our listed measurements found under the PRODUCT MEASUREMENTS tab or so you can request assistance from us. Please always refer to the information found under the SIZING TIPS tab that is specific to each product.
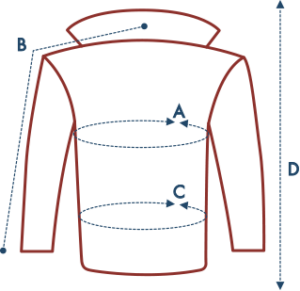
A) CHEST—Measure high under armpits, spanning the widest part of your chest, then wrap tape around for one 360-degree complete circumference measurement.
B) SLEEVE – Measure from the nape of the neck to the shoulder edge, then down the arm to the bottom of the wrist bone.
C) WAIST – Measure the widest part of your waistline for a complete 360-degree circumference measurement.
D) HEIGHT – Your total overall height
E) BODY WEIGHT – Your total body weight
A Good Jacket Fit
There is no industry standard for grading size: Any jacket we offer in, say, size 42, may very well not be the same measure as another jacket of the exact same size made by a different company, or even if made by the same company. Ultimately, chest measure is the most important area to properly fit, then all other areas of measure will have to fall into place. And some individuals who are extremely tall may find that body and/or sleeve length are more important to accommodate than even chest measure.
Do NOT attempt to guess your size in our jackets, and please understand that no jacket can be two jackets in one (you may have to make a compromise in fit somewhere). The best look is achieved wearing a shirt and undershirt, or a medium-weight sweater with undershirt; the goal being a trim, sleek look. If the application of our jackets is with multiple layers of clothing, then the original look will be compromised. When purchased oversized, please keep in mind that the jacket will fit NOT trimly but LOOSELY when fewer clothes are worn.
It is best to compare your actual body measures to the measurements of one of our products found under the tab
PRODUCT MEASUREMENTS, then follow our sizing pointers found under the tab SIZING TIPS, which are specific to each product. And never be reluctant to ask us for sizing advice; we’re here to help you get the best fit possible!As a rule here, if the jacket squares up nicely on the shoulders when worn with the sort of clothing you will wear most of the time, falls about 1 1/2″ below the top of your trousers (if a waist-length jacket), allows you to reach into trouser pockets and recover keys, wallet and change without discomfort or pain, as well as allow normal strides while walking, then this is very likely a good fit and how the jacket would have been worn when originally issued.
Using the good-fit test where one draws their arms across their chest as a barometer for snugness will almost certainly produce some binding in an A-2 jacket of the correct size, and thus push you further up the sizing scale into a very large A-2 jacket. A true 1940s A-2 jacket has no bi-swing action back (as found on the USN M-422A or G-1jackets, USAAF B-6, Tanker jacket, etc.) and is not cut for such a great range of movement as experienced when doing the arm-crossing act. If you can get that sort of movement range without binding in one of our A-2s, then it will surely be rather loose and sloppy when you aren’t drawing your arms across your chest in front of you.
What makes more sense, having a jacket that looks great and feels fine during 90% of your activities, or only when you cross your arms in front of you? Do you walk around with your arms crossed in front of you? The choice is yours and we will gladly oblige all tastes, but do try to get the look originally intended.
Measuring for Caps
 Caps – Measure the circumference around the widest portion of the head just above the ears and brow where the cap will sit. The number you derive from this exercise must be converted to a numerical cap size. Please use the chart below to convert your head circumference measure to a numerical cap size, which will then enable you to following the SIZING TIPS for our caps to place and order.
If you need any assistance, please contact us.
Head Circumference Inches Head Circumference Centimeters Hat Size 22″ 56 cm 7 22 3/8″ 57 cm 7 1/8 22 3/4″ 58 cm 7 1/4 23 1/8″ 59 cm 7 3/8 23 1/2″ 60 cm 7 1/2 Measuring for Gloves
 Gloves – Measure the circumference around the widest portion of the knuckles (excluding thumb) while holding your hand flat. The number you derive, say, 9”, is your numerical glove size. With select glove styles on this web site we ask you to provide us with this number derived from measuring your hand knuckle circumference, then we’ll make the correct size selection for you in conjunction with your input. Where we request this information, please provide the true number even if your hand measure falls between numbers, say, 9 ¼”; you’ll be able to add a memo to your order in the checkout process informing us as to the details of your hand measure and we’ll intereact with you to determine if rounding this number up is the best choice. Always follow the SIZING TIPS for each product to determine what you need to know for ordering.
If you need any assistance, please contact us.
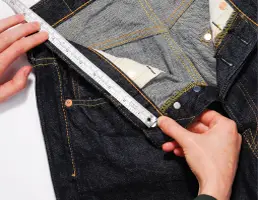
Measuring for Jeans and Trousers
A) WAIST – Using a tape measure, measure the full circumference in a 360-degree circle around your waistline where you plan to you’re your jeans or trousers (if you have a large mid-section but plan to wear the jeans or trousers below your belly, then measure the area where you will wear the jeans or trousers). It is sometimes better to measure the widest portion of your waistline regardless of where you actually where your jeans or trousers, which is the case when measuring yourself for a jacket or shirt. Always follow the SIZING TIPS for each product to determine where it is best that you should measure.
B) INSEAM – While wearing the footwear you normally would have on with the jeans or trousers you plan to order, measure your inseam length with a measuring tape beginning at the highest point of either inside leg up in the crotch area and measure down the inside leg to where you want the trousers or jeans to end; the measure you derive is your inseam length. This measuring exercise is best performed by another individual while you are standing upright with you legs straight. You may compare your inseam length to the PRODUCT MEASUREMNTS specific for each product found under the tab of this same name or on the PRODUCT INFORMATION tab.
You may also want to compare other areas of fit for each product, such as front rise or thigh width, which are found under the PRODUCT MEASUREMNTS tab specific to each product.
If you need any assistance, please contact us.
* Prices subject to change without notice.
* Ground insured within the contiguous 48 states. We combine shipping with multiple items, offer expedited shipping, and ship to other locales inside or outside the USA. Please see full shipping options, terms & conditions. Please see full shipping options, terms & conditions.