
Prices subject to change without notice
*Price includes U. S. customs duty, processing fees, currency-conversion fees, and shipping & insurance from the manufacturer to our office in the USA
*UPS Ground insured within the contiguous 48 states. We combine shipping with multiple items, offer expedited shipping, and ship to other locales inside or outside the USA. Please see full shipping options, terms & conditions.
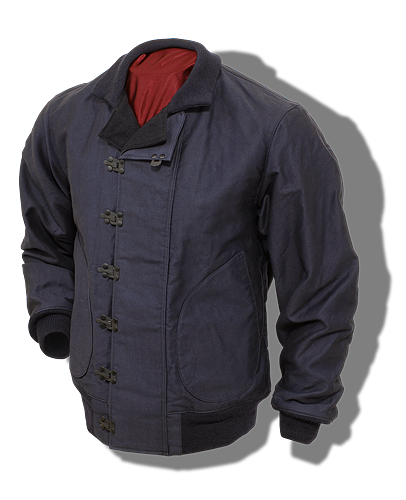
Buzz Rickson Korean War USAF 335th FIS MiG-Hunter Insignia
Buzz Rickson Korean War USAF 335th FIS MiG-Hunter Insignia
Prices subject to change without notice
*Price includes
U. S. customs duty,
processing fees, currency-
conversion fees and
shipping & insurance from
the manufacturer to the USA.
*UPS Ground insured within the contiguous 48 states. We combine shipping with multiple items, offer expedited shipping, and ship to other locales inside or outside the USA. Please see full shipping options, terms & conditions.
- Product Information
- Measuring Garments
- Body Measuring
- Product Information
The USAF’s 335th Fighter Interceptor Squadron “Chiefs,” along with the 334th & 336th squadrons, comprised the 4th Fighter Interceptor Group “Fourth but First.” The 4th FIG and its component squadrons have an august history of accomplishments dating back to their intrepid service in WWII when the initial nucleus of pilots served with the RAF in the famed Eagle squadrons, then becoming the 4th Fighter Group in August 1942, when the USAAF took control due to America’s entry in the war. The 4th was the first USAAF Fighter unit in the European Theater of Operations, hence their official nickname, “Fourth but First.” The Group went on to finish WWII as the highest-scoring USAAF fighter unit from any combat theater (combined air & ground victories; the 56th Fighter Group had the highest number of air victories), a record that may well never be surpassed due to the evolution of aerial warfare as we know it today.
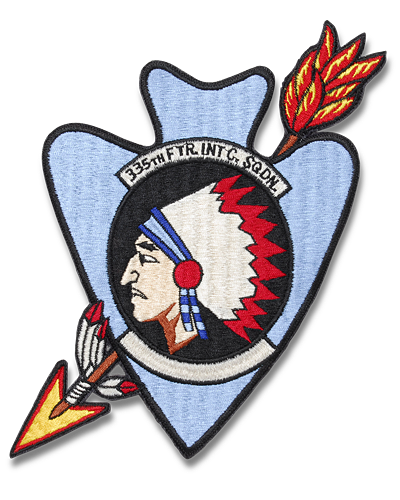
During the Korean War the 4th FIG and the 51st FIG were the only two units to fly the F-86 Sabre jet in air combat. The 335th FIS produced some outstanding pilots that included the legendary ace Capt. Ralph S. Parr, and it was the 335th FIS that went on to gain notoriety as the highest-scoring USAF fighter unit of the Korean War, shooting down more MiGs than any other USAF fighter squadron of the war for a whopping total of 218.5 MiG kills. The 335th squadron’s official insignia worn on flying jackets, flying suits, etc., is an American Indian chief wearing full headdress, which dates back to its service with USAAF in WWII and gave rise to the unit’s official nickname, “Chiefs.” Near the middle of 1952, the 335th FIS adopted a new insignia that still featured the proud Indian chief but the Indianhead was now placed in the center of a large arrowhead (7.75” tall) with a full-length arrow (10.75” long) running diagonally through the large arrowhead; above the chief was a scroll with the squadron designation and below the Indianhead was either a blank scroll or the scroll could have the individual pilots name embroidered into it.
Based on the embroidery style observed on extant original examples of this insignia and knowing many units had their insignias made in Japan while on leave during the Korean War, it is an educated guess that this new 335th FIS insignia was originally produced in Japan. Whatever is the actual history may not ever be known, but what is certain is that this revised 335th FIS insignia appears to be the largest, most colorful and elaborate squadron insignia to emerge from the Korean War. It is in light of both their second-to-none record of accomplishment and the fact that the 335th FIS had this mammoth-size, totally awesome, cool-looking insignia, that we elected to have this embroidered insignia faithfully produced exclusively for us by the Buzz Rickson’s brand.
Buzz Rickson’s are renowned for producing the most accurate-looking vintage embroidered insignia because of their attention to detail and employment of the old shuttle looms from 1940’s. Considering that the 335th FIS insignia was probably produced in Japan, it became obvious that the Japan-based Buzz Rickson’s would be the best source for executing this reproduction patch. Original examples of this insignia are nearly impossible to obtain, largely because it was used for just about one year and fighter units have a relatively small number of pilots assigned to them vs. bomber or transport units. After substantial research sourcing out surviving members of the 335th FIS from the Korean War and their giant-size insignia, we scored big time, thanks to acclaimed aviation historian Warren Thompson. Warren had several 335th FIS insignias which he made available to us for precise reproduction work, then he put us in touch with one particular pilot who flew with the 335th in the Korean War – 1st Lt. Richard “Dick” Keener – a really, really swell guy who just happened to have plenty of color film with him at the USAF’s Kimpo Air Base in South Korea.
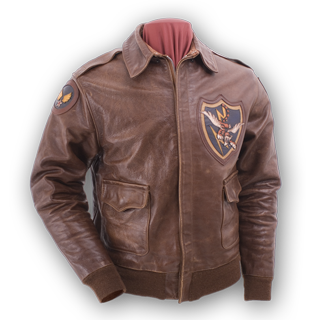
Dick Keener photographed just about everything and everyone in brilliant color, not the least of which were all of the pilots of the 4th FIG wearing a multitude of different flying jackets and gear. And, not being camera shy, Dick made sure someone took a superb, large close-up photo of himself while wearing his newly issued L-2A nylon flying jacket decorated with the giant 335th FIS insignia; it was this photo, having appeared in one of Warren Thompson’s books that originally stimulated our interest in obtaining this insignia. We had the extreme pleasure of meeting and interviewing Dick Keener on Monday 18 May 2008, whereupon we presented to him a new Buzz Rickson’s L-2A flying jacket outfitted with both the 4th FIG insignia and the 335th FIS insignia that also displays Dick’s rank and name. About half of the pilots in the 335th FIS wore both the 335h FIS and 4th FIG insignias on their jackets and Dick informed us that he added the 4th FIG insignia to his jacket shortly after he grew his mustache that he still sports today. Thanks to Dick and Warren, our dream is reality, and we can now offer this dynamic insignia deftly copied in Japan by Buzz Rickson’s.
Buzz Rickson’s products are imported from Japan
- Measuring Garments
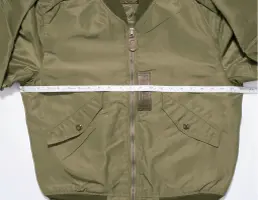
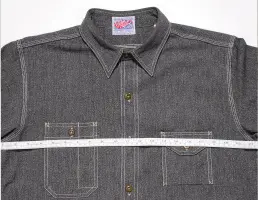
MEASURING GARMENTS
This section will explain and illustrate the measuring techniques we employed to derive the garment measurements found under the PRODUCT MEASUREMENTS tabs related to each of our products; additionally, this section provides the educational tools to enable the accurate measuring of any garments you may have access to for comparison. Garment measurements are invaluable when used in conjunction with the instructions found under the tab BODY MEASURING, as well requisite for following our advice found under the tab SIZING TIPS.
Please click on the appropriate link below that relates to the product category for which you wish to ascertain garment-measuring instructions:
- Body Measuring
BODY MEASURING
Measuring for Jackets and Shirts
 Please take these measures wearing just a thin shirt or undershirt or with no shirt at all. Simply note the following measures on a sheet of paper so you can comapre your findings to our listed measurements found under the PRODUCT MEASUREMENTS tab or so you can request assistance from us. Please always refer to the information found under the SIZING TIPS tab that is specific to each product.
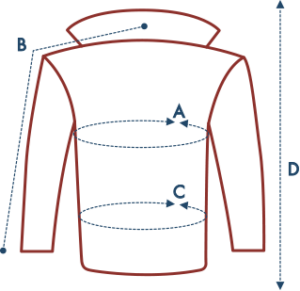
A) CHEST—Measure high under armpits, spanning the widest part of your chest, then wrap tape around for one 360-degree complete circumference measurement.
B) SLEEVE – Measure from the nape of the neck to the shoulder edge, then down the arm to the bottom of the wrist bone.
C) WAIST – Measure the widest part of your waistline for a complete 360-degree circumference measurement.
D) HEIGHT – Your total overall height
E) BODY WEIGHT – Your total body weight
A Good Jacket Fit
There is no industry standard for grading size: Any jacket we offer in, say, size 42, may very well not be the same measure as another jacket of the exact same size made by a different company, or even if made by the same company. Ultimately, chest measure is the most important area to properly fit, then all other areas of measure will have to fall into place. And some individuals who are extremely tall may find that body and/or sleeve length are more important to accommodate than even chest measure.
Do NOT attempt to guess your size in our jackets, and please understand that no jacket can be two jackets in one (you may have to make a compromise in fit somewhere). The best look is achieved wearing a shirt and undershirt, or a medium-weight sweater with undershirt; the goal being a trim, sleek look. If the application of our jackets is with multiple layers of clothing, then the original look will be compromised. When purchased oversized, please keep in mind that the jacket will fit NOT trimly but LOOSELY when fewer clothes are worn.
It is best to compare your actual body measures to the measurements of one of our products found under the tab
PRODUCT MEASUREMENTS, then follow our sizing pointers found under the tab SIZING TIPS, which are specific to each product. And never be reluctant to ask us for sizing advice; we’re here to help you get the best fit possible!As a rule here, if the jacket squares up nicely on the shoulders when worn with the sort of clothing you will wear most of the time, falls about 1 1/2″ below the top of your trousers (if a waist-length jacket), allows you to reach into trouser pockets and recover keys, wallet and change without discomfort or pain, as well as allow normal strides while walking, then this is very likely a good fit and how the jacket would have been worn when originally issued.
Using the good-fit test where one draws their arms across their chest as a barometer for snugness will almost certainly produce some binding in an A-2 jacket of the correct size, and thus push you further up the sizing scale into a very large A-2 jacket. A true 1940s A-2 jacket has no bi-swing action back (as found on the USN M-422A or G-1jackets, USAAF B-6, Tanker jacket, etc.) and is not cut for such a great range of movement as experienced when doing the arm-crossing act. If you can get that sort of movement range without binding in one of our A-2s, then it will surely be rather loose and sloppy when you aren’t drawing your arms across your chest in front of you.
What makes more sense, having a jacket that looks great and feels fine during 90% of your activities, or only when you cross your arms in front of you? Do you walk around with your arms crossed in front of you? The choice is yours and we will gladly oblige all tastes, but do try to get the look originally intended.
Measuring for Caps
 Caps – Measure the circumference around the widest portion of the head just above the ears and brow where the cap will sit. The number you derive from this exercise must be converted to a numerical cap size. Please use the chart below to convert your head circumference measure to a numerical cap size, which will then enable you to following the SIZING TIPS for our caps to place and order.
If you need any assistance, please contact us.
Head Circumference Inches Head Circumference Centimeters Hat Size 22″ 56 cm 7 22 3/8″ 57 cm 7 1/8 22 3/4″ 58 cm 7 1/4 23 1/8″ 59 cm 7 3/8 23 1/2″ 60 cm 7 1/2 Measuring for Gloves
 Gloves – Measure the circumference around the widest portion of the knuckles (excluding thumb) while holding your hand flat. The number you derive, say, 9”, is your numerical glove size. With select glove styles on this web site we ask you to provide us with this number derived from measuring your hand knuckle circumference, then we’ll make the correct size selection for you in conjunction with your input. Where we request this information, please provide the true number even if your hand measure falls between numbers, say, 9 ¼”; you’ll be able to add a memo to your order in the checkout process informing us as to the details of your hand measure and we’ll intereact with you to determine if rounding this number up is the best choice. Always follow the SIZING TIPS for each product to determine what you need to know for ordering.
If you need any assistance, please contact us.
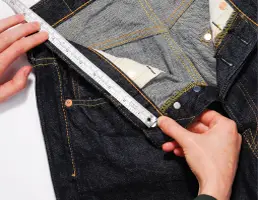
Measuring for Jeans and Trousers
A) WAIST – Using a tape measure, measure the full circumference in a 360-degree circle around your waistline where you plan to you’re your jeans or trousers (if you have a large mid-section but plan to wear the jeans or trousers below your belly, then measure the area where you will wear the jeans or trousers). It is sometimes better to measure the widest portion of your waistline regardless of where you actually where your jeans or trousers, which is the case when measuring yourself for a jacket or shirt. Always follow the SIZING TIPS for each product to determine where it is best that you should measure.
B) INSEAM – While wearing the footwear you normally would have on with the jeans or trousers you plan to order, measure your inseam length with a measuring tape beginning at the highest point of either inside leg up in the crotch area and measure down the inside leg to where you want the trousers or jeans to end; the measure you derive is your inseam length. This measuring exercise is best performed by another individual while you are standing upright with you legs straight. You may compare your inseam length to the PRODUCT MEASUREMNTS specific for each product found under the tab of this same name or on the PRODUCT INFORMATION tab.
You may also want to compare other areas of fit for each product, such as front rise or thigh width, which are found under the PRODUCT MEASUREMNTS tab specific to each product.
If you need any assistance, please contact us.
* Prices subject to change without notice.
* Ground insured within the contiguous 48 states. We combine shipping with multiple items, offer expedited shipping, and ship to other locales inside or outside the USA. Please see full shipping options, terms & conditions. Please see full shipping options, terms & conditions.