Prices subject to change without notice
*Price includes U. S. customs duty, processing fees, currency-conversion fees, and shipping & insurance from the manufacturer to our office in the USA
*UPS Ground insured within the contiguous 48 states. We combine shipping with multiple items, offer expedited shipping, and ship to other locales inside or outside the USA. Please see full shipping options, terms & conditions.
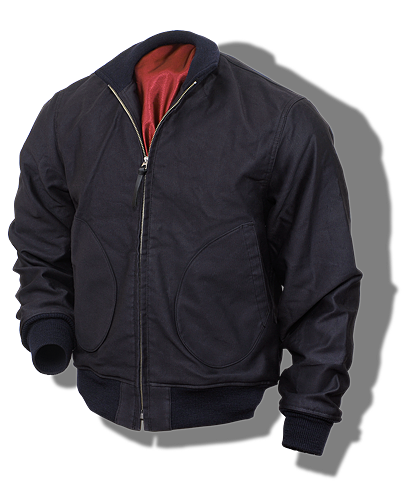
Buzz Rickson 1943 white-space: nowrap">U. S. Army Type III Service Shoes
Buzz Rickson 1943 white-space: nowrap">U. S. Army Type III Service Shoes
Prices subject to change without notice
*Price includes
U. S. customs duty,
processing fees, currency-
conversion fees and
shipping & insurance from
the manufacturer to the USA.
*UPS Ground insured within the contiguous 48 states. We combine shipping with multiple items, offer expedited shipping, and ship to other locales inside or outside the USA. Please see full shipping options, terms & conditions.
- Product Information
- Measuring Garments
- Body Measuring
- Product Information
The white-space: nowrap”>U. S. Army Type III Service Shoe was accepted by the Quartermaster Corps in June 1943 under Boston Quartermaster Depot Specification 110. This new shoe was manufactured from leather uppers with the flesh side of the animal, in this case cowhide, reversed, hence one of the nicknames for these shoes being “roughouts” since the rough, fleshy portion of the leather skin was on the outside, and the smooth, finished portion was on the inside (not to be confused with the similar shoes already on issue to the USN and USMC prior to 1943). Authorized and intended strictly for use in the field to be worn in conjunction with the M-38 Dismounted Troops canvas lace-up leggings; the reversed flesh-out leather required no polishing and would not look all that unsoldierly if scuffed and soiled vs. the Types I & II Service Shoes made of smooth finished leather that had been in use for field, garrison and service dress use up until the point when combat troops began receiving the first Type III Service Shoes in 1943.
Once the Type III Service Shoes materialized in sufficient quantities, which wasn’t until 1944, the older Types I and II Service Shoes were rarely worn in the field and were relegated then for garrison or service dress only. The Type III Service Shoes featured a heel and full sole manufactured from composite or reclaimed rubber (recycled from auto/truck tires, etc., due to the shortage of rubber during the war), steel shank for strong arch support and better retention of shoe shape, leather uppers made from hides that were chrome tanned with a heavy vegetable re-tanning, no toe box or toe cap as found on Types I and II Service Shoes, and the quarter was attached to the vamp with a reinforcing rivet in addition to four rows of heavy stitching; the rivet was deleted from all subsequent Type III Service Shoe production in the summer of 1944. The heels were hand nailed to the rubber soles and the soles were sewn and also hand nailed at key stress areas. Welting leather was specified to be of an extremely high quality that would join the shoe to the sole via the famous Goodyear welting system, which is considered the finest welting system ever devised. The Type III Service Shoes were, upon issue to the troops, usually dubbed or rubbed down with a waterproofing grease that darkened them substantially.
Type III’s had a relatively short production life, lasting approximately 18 months before they were fully phased out in favor of the Combat Boots that were produced simultaneously with the Type III’s for quite some time. During the period of issue of the Type III’s, it was not at all uncommon to see them worn without the M-38 Dismounted Troops Canvas Leggings; this was particularly a practice in the Pacific theater and among personnel of the USAAF whose duties did not require the wearing of leggings.
Due to the rugged construction, great comfort, overall smart looks and relatively cheap and ready supply, Type III Service Shoes were part of a substantial post-war consumer market where the shoes were widely sold for work wear, hunting, fishing, and other casual outdoor activities. However, the shoes achieved iconic status largely via their appearance in the all-time-classic WWII PoW adventure film drama made in 1963, “The Great Escape,” as worn by the “King of Cool” himself, legendary actor Steve Mc Queen in his leading role as the charismatic, wisecracking, cocky USAAF fighter pilot Virgil Hilts. Hilts sported Army khaki trousers worn with a cut-down sweatshirt and vintage A-2 leather aviator’s jacket all the while therapeutically bouncing a baseball off the concrete walls of the “cooler” into his baseball-mitted hand in between persistent schemes to break out of the prison camp, only to repeat the process again upon recapture. It was this film and Mc Queen’s “Hilts” character that fueled enormous interest again in the Type III Service Shoes that reached fanatical proportions in Japan.
This fanatical interest is what largely instigated Buzz Rickson’s to begin production of the Type III Service Shoes to the same pedigree of quality and depth of detail encountered on the vintage shoes from WWII. Years later, the Type III Service Shoes began to be reproduced by a variety of companies in the USA, the manufacture of which was almost entirely farmed out to low-end factories in developing nations and the market for which these shoes were made remains almost exclusively dominated by those performing various forms of WWII historical presentations, performances and/or re-enactments. Such shoes produced and sold at far lower price points than those made in Japan are intended to merely resemble the original Type III Service Shoves, whereas the Buzz Rickson’s Japanese-made examples are stitch-for-stitch masterful works of beauty and quality intended to perform to the same rugged standards as did the vintage shoes that won WWII, thus the premium-grade leather uppers can soldier on for years and years with new Lite Tread rubber hitting the ground, thanks to the complete re-soling services available from the factory. This is how quality footwear used to be in the USA back before the era of cheap disposability permeated society. All Buzz Rickson’s Type III Service Shoe production follows the same concept as employed by the white-space: nowrap”>U. S. Army Quartermaster Corps in the 1940’s – make ‘em to last, make ‘em to be repaired, make ‘em for the duration!
Just as featured in Esquire magazine, Buzz Rickson’s Type III Service Shoes are produced exactly as the GI shoes were produced by legendary footwear manufacturers in the USA that have long since vanished: The uppers are manufactured from a beefy, chrome-tanned cowhide leather that is then vegetable tanned for no less than 12 weeks, after which the leather is sewn and hand lasted over a period of days to ensure maximum stretch and flexibility to the finished shoe, and finally the lasted uppers are sewn using the famous Goodyear storm welt to premium-grade welting leather – NEVER are soles vulcanized to the uppers or sewn in some cheap manner to duplicate the appearance of a true Goodyear welt at a sacrifice to comfort, quality and durability. The Buzz Rickson’s Type IIIs also feature precise custom-made copies of the famous 1940’s Lite Tread rubber heels and soles, with the soles having the rare “chain” pattern that was produced but for short time during WWII and is the rarest tread pattern employed in the production of rubber soles for the military at that time. Today, no other Type III Service Shoes available in the USA offer the Lite Tread soles and heels.
These are classic pieces of rugged, smart-looking, comfortable footwear that never go out of style, whether worn with jeans, khaki’s or hiking shorts. Please take note of these high-quality features found on Buzz Rickson’s Type III Service Shoes:
• Size and white-space: nowrap”>U. S. Army inspector markings embossed in the leather foot bed as per the vintage exam
• Authentic white-space: nowrap”>U. S. Army BQD contract and spec. markings ink stamped onto the inside quarters of each shoe precisely matching the style and placement as found on the vintage examplle
• Authentic size marking ink stamped to the rubber soles as was often done during WWII to better enable easier, rapid identification of shoe size when storing or issuing the shoes by the quartermaster • Uppers sewn with authentic off-white thread
• Premium-grade, flesh-out leather uppers, chrome tanned, then vegetable tanned for greater durability and better fit when lasted and worn
• Premium-grade, veg-tanned leather welting attached using the Goodyear welting system with heavy-duty corded thread
• Quadruple-stitched quarters for durability as per the original spec. then bolstered by a reinforcing rivet as found on the early Type IIIs
• Custom-made all-cotton shoe laces that are heavily waxed for greater service life and moisture repellence, as per many of the WWII military shoe laces
• Hand-lasted uppers for better fit and comfort • Heavy, non-corrosive steel shank for heavy-duty support and longer shoe life and shape maintenance
• Custom-made precision copies of the famous Lite Tread rubber soles and heels from WWII; soles are sewn via the Goodyear welting system employed to make the shoes during WWII, then heels are nailed in place by hand and soles are reinforced with nails at key stress points, precisely matching the original spec.
• Premium-grade, veg-tanned leather insoles for better breathing of feet and moisture absorption. Current fittings available as measured on a Brannock device (this is the sizing instrument used to determine shoe size found in all true shoe stores): white-space: nowrap”>U. S. A. men’s sizes 8, 8 1/2, 9, 9 1/2, 10 & 10 1/2. If you plan on wearing a heavy rubber insole or prefer a looser fit, then the available size range will be smaller than indicated here.
Buzz Rickson’s goods are imported from Japan
- Measuring Garments
MEASURING GARMENTS
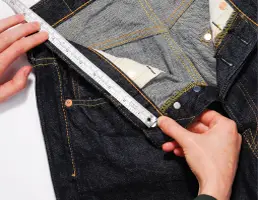
This section will explain and illustrate the measuring techniques we employed to derive the garment measurements found under the PRODUCT MEASUREMENTS tabs related to each of our products; additionally, this section provides the educational tools to enable the accurate measuring of any garments you may have access to for comparison. Garment measurements are invaluable when used in conjunction with the instructions found under the tab BODY MEASURING, as well requisite for following our advice found under the tab SIZING TIPS.
Please click on the appropriate link below that relates to the product category for which you wish to ascertain garment-measuring instructions:
- Body Measuring
BODY MEASURING
Measuring for Jackets and Shirts
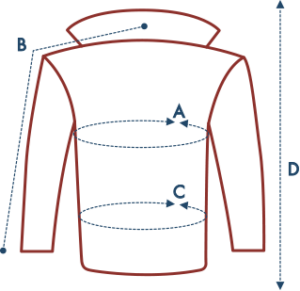 Please take these measures wearing just a thin shirt or undershirt or with no shirt at all. Simply note the following measures on a sheet of paper so you can comapre your findings to our listed measurements found under the PRODUCT MEASUREMENTS tab or so you can request assistance from us. Please always refer to the information found under the SIZING TIPS tab that is specific to each product.
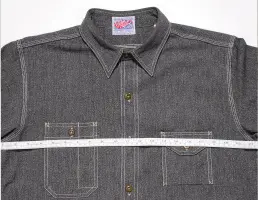
A) CHEST—Measure high under armpits, spanning the widest part of your chest, then wrap tape around for one 360-degree complete circumference measurement.
B) SLEEVE – Measure from the nape of the neck to the shoulder edge, then down the arm to the bottom of the wrist bone.
C) WAIST – Measure the widest part of your waistline for a complete 360-degree circumference measurement.
D) HEIGHT – Your total overall height
E) BODY WEIGHT – Your total body weight
A Good Jacket Fit
There is no industry standard for grading size: Any jacket we offer in, say, size 42, may very well not be the same measure as another jacket of the exact same size made by a different company, or even if made by the same company. Ultimately, chest measure is the most important area to properly fit, then all other areas of measure will have to fall into place. And some individuals who are extremely tall may find that body and/or sleeve length are more important to accommodate than even chest measure.
Do NOT attempt to guess your size in our jackets, and please understand that no jacket can be two jackets in one (you may have to make a compromise in fit somewhere). The best look is achieved wearing a shirt and undershirt, or a medium-weight sweater with undershirt; the goal being a trim, sleek look. If the application of our jackets is with multiple layers of clothing, then the original look will be compromised. When purchased oversized, please keep in mind that the jacket will fit NOT trimly but LOOSELY when fewer clothes are worn.
It is best to compare your actual body measures to the measurements of one of our products found under the tab
PRODUCT MEASUREMENTS, then follow our sizing pointers found under the tab SIZING TIPS, which are specific to each product. And never be reluctant to ask us for sizing advice; we’re here to help you get the best fit possible!As a rule here, if the jacket squares up nicely on the shoulders when worn with the sort of clothing you will wear most of the time, falls about 1 1/2″ below the top of your trousers (if a waist-length jacket), allows you to reach into trouser pockets and recover keys, wallet and change without discomfort or pain, as well as allow normal strides while walking, then this is very likely a good fit and how the jacket would have been worn when originally issued.
Using the good-fit test where one draws their arms across their chest as a barometer for snugness will almost certainly produce some binding in an A-2 jacket of the correct size, and thus push you further up the sizing scale into a very large A-2 jacket. A true 1940s A-2 jacket has no bi-swing action back (as found on the USN M-422A or G-1jackets, USAAF B-6, Tanker jacket, etc.) and is not cut for such a great range of movement as experienced when doing the arm-crossing act. If you can get that sort of movement range without binding in one of our A-2s, then it will surely be rather loose and sloppy when you aren’t drawing your arms across your chest in front of you.
What makes more sense, having a jacket that looks great and feels fine during 90% of your activities, or only when you cross your arms in front of you? Do you walk around with your arms crossed in front of you? The choice is yours and we will gladly oblige all tastes, but do try to get the look originally intended.
Measuring for Caps
 Caps – Measure the circumference around the widest portion of the head just above the ears and brow where the cap will sit. The number you derive from this exercise must be converted to a numerical cap size. Please use the chart below to convert your head circumference measure to a numerical cap size, which will then enable you to following the SIZING TIPS for our caps to place and order.
If you need any assistance, please contact us.
Head Circumference Inches Head Circumference Centimeters Hat Size 22″ 56 cm 7 22 3/8″ 57 cm 7 1/8 22 3/4″ 58 cm 7 1/4 23 1/8″ 59 cm 7 3/8 23 1/2″ 60 cm 7 1/2 Measuring for Gloves
 Gloves – Measure the circumference around the widest portion of the knuckles (excluding thumb) while holding your hand flat. The number you derive, say, 9”, is your numerical glove size. With select glove styles on this web site we ask you to provide us with this number derived from measuring your hand knuckle circumference, then we’ll make the correct size selection for you in conjunction with your input. Where we request this information, please provide the true number even if your hand measure falls between numbers, say, 9 ¼”; you’ll be able to add a memo to your order in the checkout process informing us as to the details of your hand measure and we’ll intereact with you to determine if rounding this number up is the best choice. Always follow the SIZING TIPS for each product to determine what you need to know for ordering.
If you need any assistance, please contact us.
Measuring for Jeans and Trousers
A) WAIST – Using a tape measure, measure the full circumference in a 360-degree circle around your waistline where you plan to you’re your jeans or trousers (if you have a large mid-section but plan to wear the jeans or trousers below your belly, then measure the area where you will wear the jeans or trousers). It is sometimes better to measure the widest portion of your waistline regardless of where you actually where your jeans or trousers, which is the case when measuring yourself for a jacket or shirt. Always follow the SIZING TIPS for each product to determine where it is best that you should measure.
B) INSEAM – While wearing the footwear you normally would have on with the jeans or trousers you plan to order, measure your inseam length with a measuring tape beginning at the highest point of either inside leg up in the crotch area and measure down the inside leg to where you want the trousers or jeans to end; the measure you derive is your inseam length. This measuring exercise is best performed by another individual while you are standing upright with you legs straight. You may compare your inseam length to the PRODUCT MEASUREMNTS specific for each product found under the tab of this same name or on the PRODUCT INFORMATION tab.
You may also want to compare other areas of fit for each product, such as front rise or thigh width, which are found under the PRODUCT MEASUREMNTS tab specific to each product.
If you need any assistance, please contact us.
* Prices subject to change without notice.
* Ground insured within the contiguous 48 states. We combine shipping with multiple items, offer expedited shipping, and ship to other locales inside or outside the USA. Please see full shipping options, terms & conditions. Please see full shipping options, terms & conditions.